Imagine the sun dipping below the horizon, casting a golden glow over your campsite as the first stars begin to twinkle in the deepening blue sky. The crackle of the campfire fills the air, and the smoky aroma of burning wood mingles with the irresistible scent of melting cheese. You’ve spent the day hiking rugged trails or casting lines into a serene lake, and now it’s time to unwind with something simple yet soul-warming. Enter the campfire grilled cheese—a timeless classic reimagined for the great outdoors.
This recipe is the epitome of campfire cooking perfection because it requires minimal ingredients and gear, yet delivers maximum comfort. No need for a full kitchen setup; just a trusty cast iron skillet and the steady heat of glowing embers. It’s forgiving for beginners, quick to whip up after a long day, and endlessly customizable to suit your cravings. Picture the golden crust forming as the bread sizzles, the cheese oozing in gooey rivers, and that satisfying crunch with every bite. It’s not just food; it’s a hug from the wilderness, evoking childhood memories while embracing the rugged adventure of camping.
What makes it even better? It’s field-tested on countless trips—from solo backpacking jaunts to family campouts. The smoky infusion from the fire adds a depth of flavor you can’t replicate at home, turning a basic sandwich into a gourmet treat. Whether you’re toasting marshmallows nearby or sharing stories around the flames, this grilled cheese brings everyone together. Get ready to elevate your outdoor meals and discover why it’s a must-try for every camper. Your taste buds (and your fellow adventurers) will thank you!
Recipe Overview
Prep Time: 5 minutes
Cook Time: 10 minutes
Servings: 4 sandwiches
Difficulty Level: Easy
Special Equipment Needed: Cast iron skillet or griddle, long-handled tongs, campfire with established coals (avoid direct flames for even cooking).
Ingredients
- 8 slices sturdy bread (such as sourdough or whole grain; opt for thicker slices to hold up to campfire heat—substitute with tortillas for a gluten-free twist)
- 8-12 slices cheese (cheddar, American, or a mix; use high-melt varieties for best gooey texture; pre-slice at home to save time in the field)
- 4 tablespoons butter (softened; if at a cool campsite, let it warm slightly—campfire adaptation: use oil if butter is unavailable)
- Optional add-ins: Sliced tomatoes, bacon bits, or herbs (keep it simple to avoid sogginess over the fire)
Step-by-Step Instructions
- Build your campfire safely in a designated pit, letting it burn down to a bed of hot coals (about 30-45 minutes). This provides steady, indirect heat—avoid open flames to prevent burning your sandwich. Position your cast iron skillet over the coals using rocks or a grate for stability.
- Butter one side of each bread slice generously. The butter will create that crispy, golden exterior as it melts into the hot skillet. If the butter is too cold, warm it briefly by the fire for easier spreading.
- Assemble the sandwiches: Place 2-3 cheese slices between two buttered bread slices (cheese side in). Press gently to seal. For extra flavor, add a thin tomato slice or sprinkle of herbs now—the campfire smoke will infuse everything with a subtle, woodsy aroma.
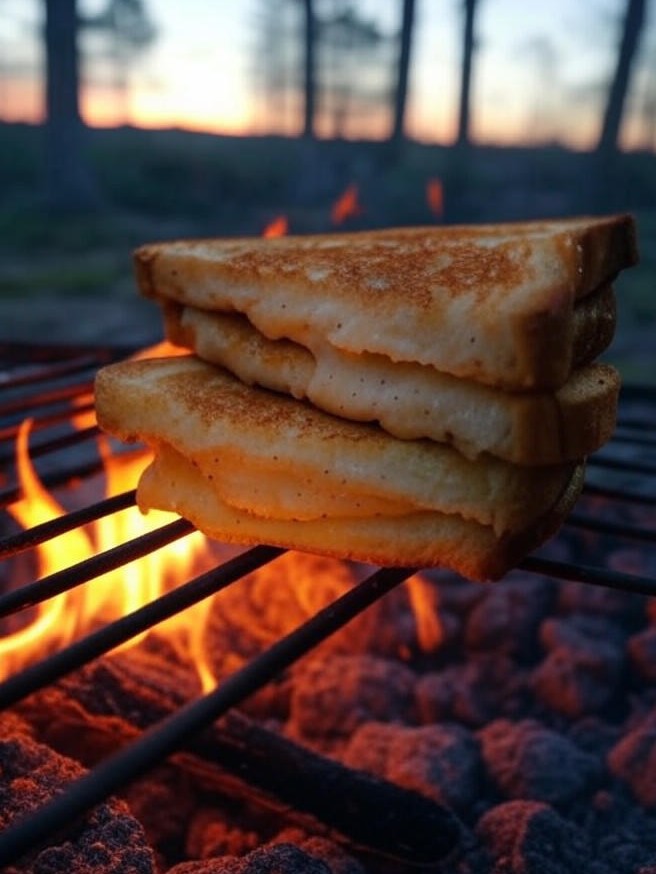
- Place the assembled sandwich in the preheated skillet. Cook for 3-4 minutes per side, using tongs to flip carefully. Watch for a deep golden brown and listen for the sizzle; the cheese should start bubbling and stretching like molten lava, filling the air with that cheesy, toasty scent that draws everyone to the fire.
- Remove from the skillet once both sides are crisped and the cheese is fully melted (internal temp around 165°F if you have a thermometer). Let it rest for a minute on a plate or log—the steam escaping will make your mouth water. Slice in half diagonally for that perfect, gooey cross-section.
- Serve immediately by the fire’s glow, perhaps with a side of roasted veggies or just your favorite camp beverage. The contrast of crunchy bread, creamy cheese, and smoky undertones is pure bliss.
Key Takeaways
- Always prioritize safety: Keep a bucket of water nearby for the fire, and never leave your skillet unattended to avoid flare-ups from dripping butter.
- For even cooking, rotate the skillet occasionally as campfire heat can be uneven—patience yields the perfect melt without scorching.
- Variation idea: Go gourmet with smoked gouda and apple slices for a sweet-savory twist, or make it vegan using plant-based cheese and butter alternatives.
- Pro tip: Pre-butter and assemble sandwiches at home, wrap in foil, and store in a cooler—they’re easier to handle in low light at camp.
- If coals are too hot, elevate the skillet with sticks or use a tripod setup to control the temperature and prevent burnt bottoms.
- Storage advice: Best eaten fresh, but leftovers can be wrapped in foil and reheated over the fire the next morning for breakfast.
- Enhance the atmosphere: Pair with storytelling or stargazing—the sensory joy of that first melty bite under the open sky is unforgettable.
So, what are you waiting for? Pack your bread, cheese, and skillet, head out to your next campsite, and fire up this grilled cheese masterpiece. It’s the simple joy that makes outdoor life so rewarding—try it tonight and taste the adventure!