Imagine the sun dipping below the horizon, casting a golden glow over your campsite as the first stars peek out. The air is crisp with the scent of pine and woodsmoke, and your campfire crackles invitingly, its flames dancing like they’re eager for the night’s festivities. You’ve got your crew gathered ’round—friends laughing, stories flowing—and now it’s time for the real magic: s’mores. But why settle for store-bought when you can craft homemade marshmallows right there by the fire? These fluffy, pillowy treats are the ultimate campfire upgrade, transforming a simple roast into a symphony of gooey sweetness that melts perfectly over the coals.
Homemade marshmallows are a game-changer for outdoor cooking because they’re surprisingly straightforward to make with basic gear, yet they elevate every bite. No more dense, artificial puffs—these are light, vanilla-scented clouds that toast to a golden crisp, releasing that irresistible caramelized aroma that draws everyone closer to the fire. Field-tested on countless wilderness weekends, this recipe adapts beautifully to campfire conditions: you’ll use a trusty Dutch oven for steady heat, whipping up a batch while the embers glow. The process builds anticipation, filling the air with the rich, sugary perfume of boiling syrup, and the end result? Marshmallows so fresh and flavorful, they’ll have you skipping the chocolate and just savoring the fluff. Whether you’re a solo adventurer or hosting a family campout, this recipe captures the essence of outdoor bonding—simple, sensory, and utterly satisfying. Get ready to impress; your s’mores will never be the same.
Recipe Overview
Prep Time: 15 minutes
Cook Time: 20-25 minutes (plus 4-6 hours setting time)
Servings: 30-40 marshmallows
Difficulty Level: Intermediate (requires careful heat management over fire)
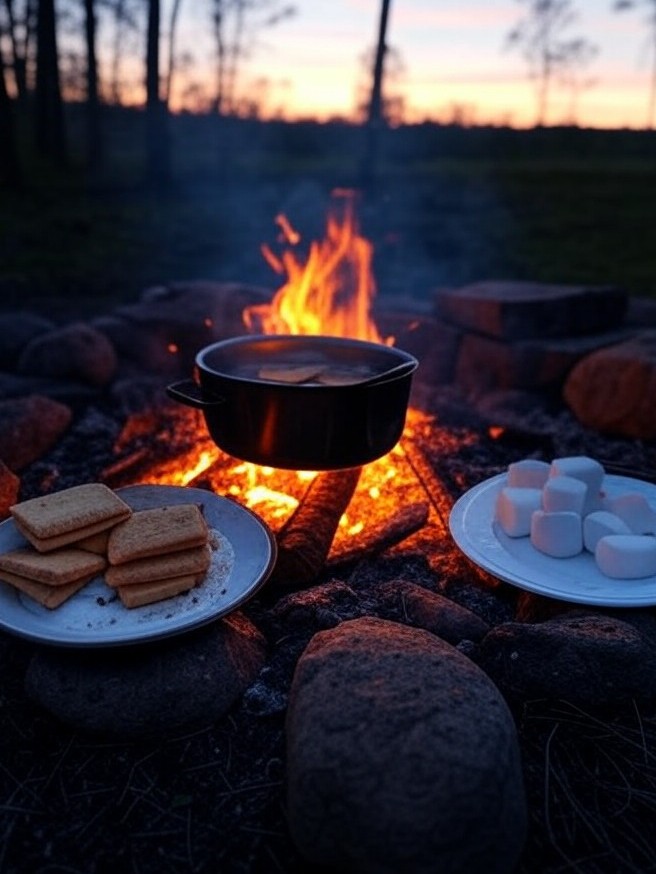
Special Equipment Needed: Dutch oven or heavy cast-iron pot, campfire-safe thermometer (optional but recommended for syrup stage), stand mixer or hand whisk (battery-powered for portability), 9×13-inch pan or foil-lined board, non-stick spray, and a stable campfire setup with hot coals.
Ingredients List
- 3 packets (about 21g) unflavored gelatin – essential for that signature fluff; no substitutes for best results.
- 1 cup cold water, divided – use purified if your campsite water is questionable.
- 1 ½ cups granulated sugar – white sugar for clarity; brown sugar can work for a caramel twist but may alter texture.
- 1 cup light corn syrup – honey is a great campfire-friendly sub for natural sweetness, though it might make them slightly stickier.
- ¼ teaspoon salt – enhances flavor without overpowering.
- 1 tablespoon vanilla extract – pure for aroma; experiment with flavored extracts like peppermint for variety.
- ½ cup powdered sugar + ¼ cup cornstarch (for dusting) – prevents sticking; mix ahead in a zip-top bag for easy transport.
- Optional: Food coloring for fun, vibrant marshmallows that kids love.
Step-by-Step Instructions
-
Bloom the gelatin: In a heat-safe bowl, sprinkle the gelatin over ½ cup cold water. Let it sit for 10 minutes to absorb and soften—this “bloom” is key for fluffiness. Do this away from the fire to avoid premature melting.
-
Prepare the sugar syrup: In your Dutch oven over medium-hot campfire coals (aim for steady, even heat—use a tripod if needed), combine the remaining ½ cup water, granulated sugar, corn syrup, and salt. Stir until sugar dissolves, then attach a thermometer if you have one. Bring to a boil without stirring, cooking until it reaches 240°F (soft-ball stage)—about 10-12 minutes. Watch closely; hot sugar is lava-like, so keep kids and pets at a safe distance. The syrup will bubble vigorously, filling the air with a sweet, toasty scent.
-
Whip the mixture: Remove the Dutch oven from the heat and slowly pour the hot syrup into the bloomed gelatin while mixing on low speed (or whisk vigorously by hand). Increase to high and whip for 12-15 minutes until thick, glossy, and tripled in volume—like a fluffy meringue. The bowl will warm your hands as vanilla’s comforting aroma wafts up. Add vanilla (and coloring if using) in the last minute.
-
Pour and set: Spray a 9×13-inch pan (or foil-covered board) with non-stick spray and dust with half the powdered sugar-cornstarch mix. Pour in the marshmallow batter, smoothing the top. Dust the surface with the remaining mix. Cover loosely with foil and let set in a cool spot away from the fire for 4-6 hours (overnight is ideal). The texture will firm up to a soft, springy delight amid the night’s chill.
-
Cut and store: Once set, turn out onto a dusted surface and cut into squares with a greased knife or scissors. Toss in the dusting mix to prevent sticking. Now, skewer ’em over the embers for that perfect char—golden outside, molten inside.
Key Takeaways
- Safety first: Hot sugar syrup can cause serious burns—use long-handled tools and keep a bucket of water nearby for emergencies.
- Fire management: Maintain consistent coals rather than open flames for even cooking; rotate your Dutch oven as needed to avoid hotspots.
- Texture tip: If it’s too humid at camp, marshmallows may be stickier—dust generously and store in an airtight container.
- Variation idea: Infuse with campfire-toasted coconut or cocoa for gourmet s’mores; add during whipping for bursts of flavor.
- Storage advice: Keep in a cool, dry spot for up to a week; they travel well in a sealed bag for multi-day trips.
- Pro tip: No thermometer? Test syrup by dropping a bit in cold water—if it forms a soft ball, it’s ready.
- Enhance the experience: Pair with homemade chocolate for a fully from-scratch treat that screams wilderness indulgence.
With the fire dying down and stars overhead, nothing beats the simple joy of roasting your own creations. So, pack your Dutch oven, rally your camp crew, and whip up these homemade marshmallows on your next adventure—you won’t believe how easy it is to make magic by the fire!